Process guide for
Web Registration
· Open
the IE browser window and type in the URL (http://online.ucp.edu.pk)

· Click
the link titled Student Login.
· Student
Login page looks like this.
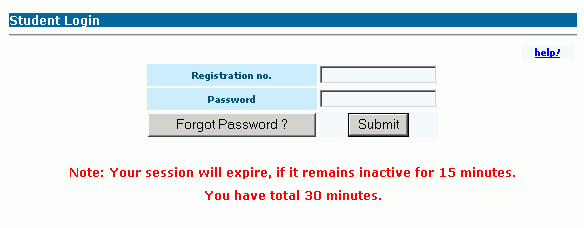
· Enter
your registration number and password and press Submit.
· After
login, Student Services form will open on left side.
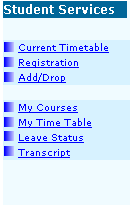
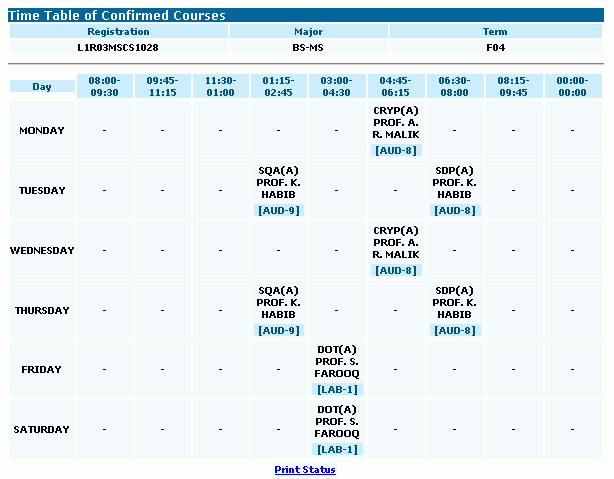
· Clicking
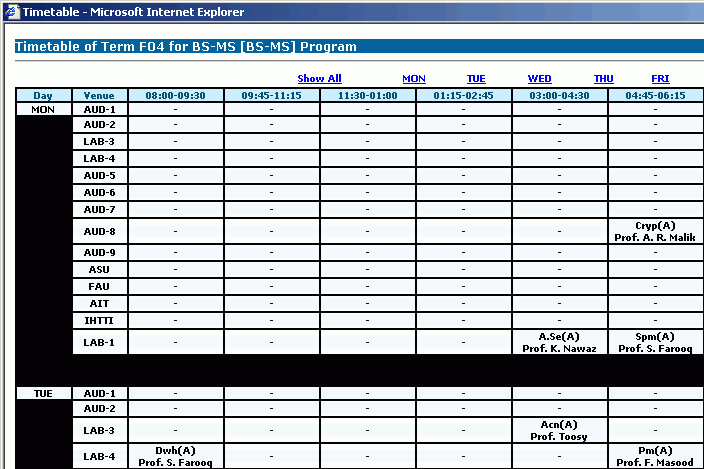
on Semester Schedule service (Current Timetable) would popup semester
schedule on the screen for the current term and your major.
You can easily find out which sections belong to your major by hovering
your mouse over a specific section in the timetable.
· Clicking
on Add/Drop service would open Registration form on right side.
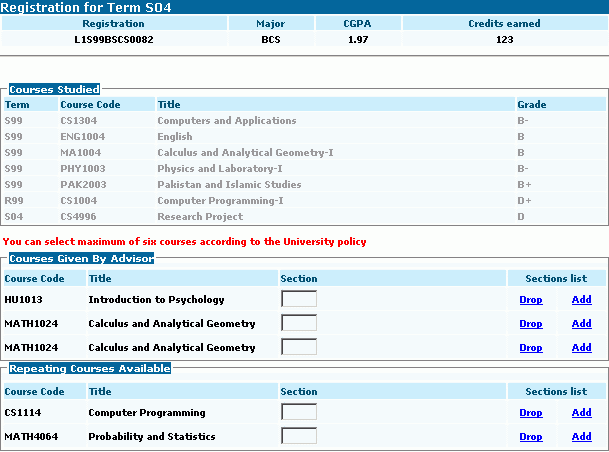
· The
Registration Form comprises of 3 sections.
·
Courses Studied
Contains list of all the studied courses along with there grades.
Note: In the
following section a student can only add up to 6 courses by maximum
·
Courses Available / Advisor Given Courses
Contains list of all courses that a student can study.
·
Repeating Courses Available
Contains list of repeating courses that a student can repeat.
· Now,
by clicking Add would open Sections window, where the student will be
able to see a list of sections along with the teachers who will be teaching
them and the section specific timetable that are specific to the selected
course and specific to his/her major.
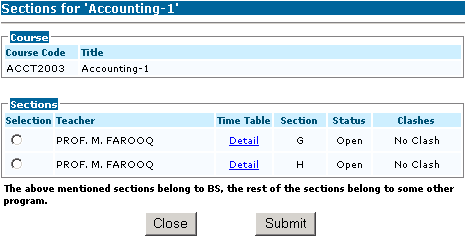
· This
window also displays you the current status of the list of sections displayed
(i.e.: Open/Close) and would also inform you if you happen to have a clash
with any of your currently reserved sections.
· Selecting
a section and pressing Submit would reserve this section for you. And
would take you back to the Registration page where you will be able to
see your currently reserved section in the Section textbox next to the
selected course.
· Now,
if you plan to change your selected section you can do it easily by repeating
the same steps as you did incase of Adding a section.
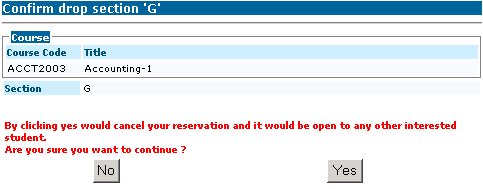
· Now,
if you plan to drop the selected section you can do it by clicking Drop.
· A confirmation
window will open, asking you to cancel reservation for the selected section.
Pressing Yes would cancel your reservation for this section and it would
be made available to other students. Pressing No would simply take you
back to the Registration page.
· Complete
your selection of desired sections and press Next button at the bottom
of the page to proceed.
· Your
registration status will be displayed to you in effect to clicking Next
button.
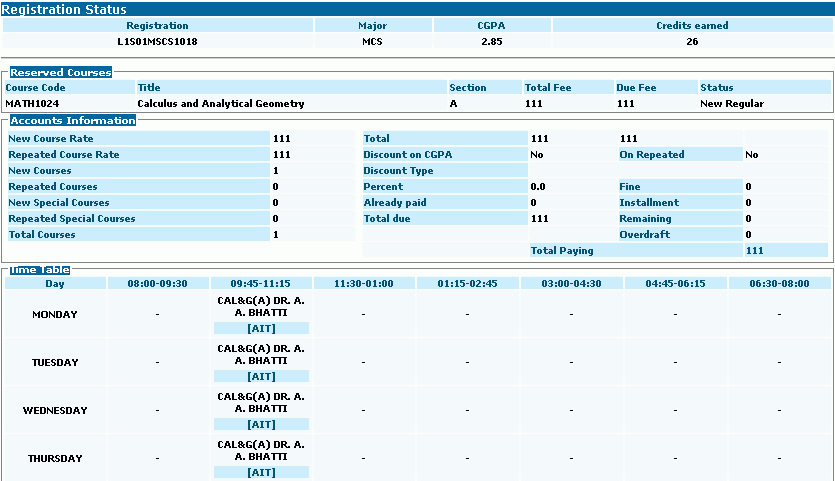
· The
Registration Status comprises of 3 sections.
·
Registered Courses
Contains list of all of your currently reserved courses along with there sections, total fee, due fee and status.
·
Accounts Information
Contains detailed account information according to your currently reserved courses (i.e.: Discount, Fine, Installment, Total payable amount etc.).
·
Timetable
Displays the timetable according to your currently reserved courses.
· Now,
press Back if you wish to edit your current selection. Or press Cancel
if you wish to cancel all of your reservations.
· Pressing
Submit would re-confirm if you wish to proceed or not. If pressed Ok your
registration will be finalized and you will not be able to change your
courses until Add/Drop session.
· Pressing
Submit and pressing Ok would result in Final Status window.
· This
window contains list of all of your recently registered courses along
with their sections and their timetable.

· You
can view your registration status the next time you log in and click Registration.
· Clicking
on My Courses service would open Section Management form on right side.
· The
Section Management Form comprises of different number of sections depending
on the type of exams that have been defined for the selected
section.
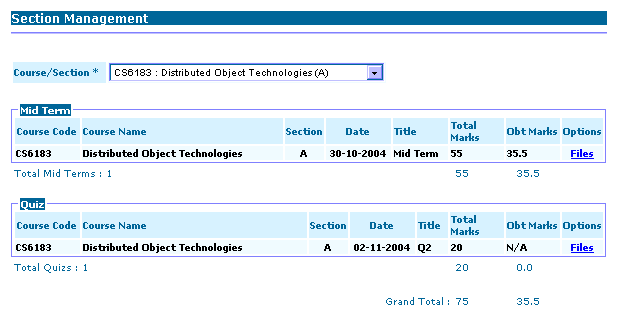
· Each
section corresponds to the exam type i.e., Mid Term, Quiz etc.
· There
may be multiple exams defined for each exam type in each section.
· Clicking
on the Files service against the exam would open the popup for Downloading
the file(s) that have been uploaded against the exam.
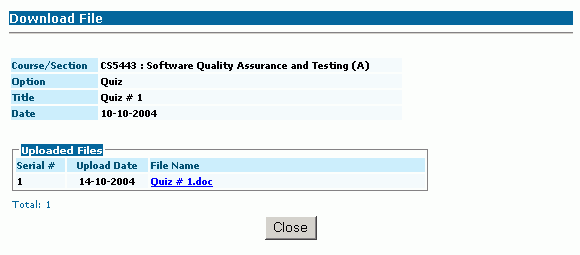
· The
Download File form has one section.
· Uploaded
Files
Displays the uploaded files for the exam and a link to download the file.
· You
can also view your current timetable by clicking My Timetable in Student
Service section.
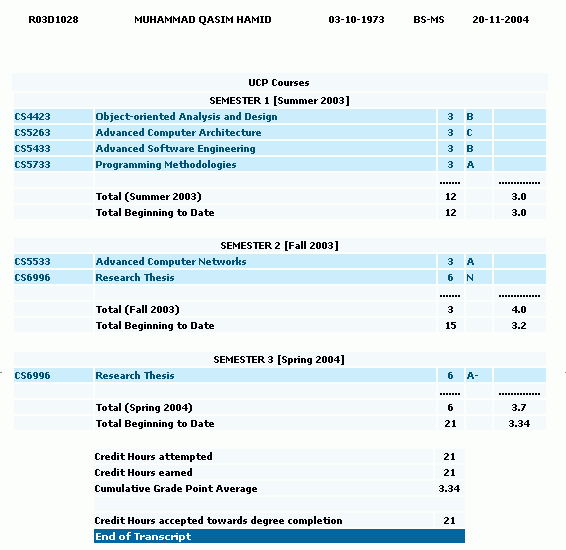
· You
can check your Transcript by clicking on the Transcript service.